Wednesday, September 23, 2015

Calaguas Island Adventure - Swim and Hike Day

Day 2 - We woke up early at 4:30AM while most of the other guests were still asleep. We rushed to change into our swimming attires and took a walk on the shore hoping to get a glimpse of the sunrise.

Where dusk meets dawn

Good Morning Calaguas!

We walked and walked until we reached the end of the shore. Don't mind our bagong gising looks! We took the opportunity to take pictures everywhere haha it's not everyday that we get to see such wonderful view every morning!


Basically, we spent our first two hours swimming and trying out the skim board while waiting for breakfast. The use of skim board is free as part of the package but they only have one so we just had a brief moment with it as other guests were waiting to borrow it also. Early morning swimming gave me goosebumps! The water was awfully cold. The sea breeze made it even more chilly!


After breakfast, we changed into our hiking clothes. Hiking is also part of the tour package. We will traverse Tinago Hill as per Kuya Mark, our guide.

As far as I can remember, the hike took more or less 1 hour to go up and down. I was just wearing flip flops but thankfully the trail turned out to be okay than I expected.

 Tinago Hill in Pictures 

The Up hill trail - Almost there

The quiet, peaceful life

I want to wake up everyday with this view!

Seeing the rest of Mahabang Buhangin from the top

Going back to the beach proper

After hiking, we just ate lunch and prepared our things. We were scheduled to leave at 2PM. I can't believe how fast time flies! We just got there and now we're leaving :(

Tents set up on the beach amidst the scorching heat

We spent another 2 hours to get back to Paracale Port. We were supposed to surf at Bagasbas Beach as the last part of the itinerary but our guide said that waves are not present during that time of the year. With that, our Calaguas Island adventure officially came to an end. We were happy with our summer getaway, I just wished we could have stayed longer.

The place is definitely a piece of heaven. Simple living at it's finest. The beauty of God's creation at it's best.


Friendly reminders that you may want to take into account before planning your trip :)

There are no hotels or rooms of any kind - please bring tents with you if you do not wish to avail a tour package. 

As for the water, the island's source of water comes from a deep well. You have to pay 10 pesos per pale. You can't expect much from the toilet either as it is very basic but clean. 

There is no electricity and cellphone signal. 

If you are not going to avail a tour package, bring lots of food and water as they only have a simple sari sari store with limited merchandise.


Tuesday, September 22, 2015

Achievement Unlocked: UA waxing for the first time

For so long, Iv'e been really curious about under arm waxing but I always end up shaving or plucking my hairs as I am afraid of the pain that it may cause. I don't know what's wrong with me but I'm easily affected with what I read online about experiences with waxing, how it didn't turn out well for most people and it's possible bad side effects.

So there, just last Sunday I decided to conquer my fear. What made me change my mind? After plucking or shaving, my armpits become itchy and dry with chicken skin all over. I'm not a regular user of deodorants but I noticed that my armpits become darker whenever I shave or pluck. I want to change this, so the best recommended solution so far is to try waxing.

The Remedy

I went to the Watsons Store in SM North Edsa and bought a hot wax kit by glam works for only P69.00. They also have a cold wax kit for P99.00.


I opted to buy the hot wax as I feel that hairs will stick better if removed with the wax directly rather than with waxing paper.

The instructions and do's & dont's are clearly stated on the back of the box. I read it carefully and followed everything like a freshman student.


Inside the box are 2 pieces of wax, melting pan and a spatula.


Waxing Time!

Before the waxing proper, I cleaned my armpits with cotton balls and water and put baby powder on both underarms so that the wax will stick better. After that, I let the wax melt into the heated pan for a couple of seconds. I stirred the wax until the consistency became thick but still soft. I dabbed a little amount on my fingertips to assess if it's cool enough.


 I put an ample amount of wax on the spatula and started applying it on my right armpit first. After 15 seconds I stretched the skin taut and removed the wax downward without hesitation.


Happy with the Results!

The first application turned out really well! Lots of hairs sticked to the wax and the process was not that painful. Sure, I felt a little sting but since I'm used to plucking the itchy, stinging sensation was no big deal. There are some hairs that were not removed so I just repeated the procedure to get a more satisfying result. I did the same thing to my left armpit and I couldn't be more happier with the outcome :)

Excuse me for the pics! I just want to show that the product is indeed effective considering it's cheap price. 

1st application result

Follow up application


After Thoughts

Overall, I'm happy that I finally tried underarm waxing. I will definitely do it again but I want to try the cold wax next time. 

Hot wax is easy to use but it's also easy to get cold. Make sure that you use it real quick to avoid re-heating. As for me I re-heated it twice.

It's the 4th day after the procedure and I noticed that my armpits are softer and smoother and so far no hairs are growing just yet :) 


Wednesday, August 5, 2015

Calaguas Island Adventure - Touchdown! Mahabang Buhangin

On the summer of 2014, me and my office mate friends decided to plan a trip for our then upcoming business unit holiday in the office. At first we were thinking of going to Baler but then we thought we can go to Baler anytime as it is just within Luzon. One of our friends suggested Calaguas Island as the place is becoming more and more popular for beach - goers. We talked things over and unanimously agreed to give the place a shot.

We availed a tour package under Calaguas Island Experience: ala iAdventure Style. The package costs P2,000 per person for a 2D/1N tour. We had to pay the 50% downpayment a week before the trip. We then bought a one way ticket from Cubao to Daet, Camarines Norte via Superlines - during that time the fare was P515 per person. As it was during the summer peak season we booked our tickets in advance.

May 16 - Night of the Trip

Our bus was scheduled to depart at 8:30PM. We chose to travel during the night as it is much faster. luckily, our bus departed on time. Getting from Cubao to Daet took us more or less 8 hours (including our 30 minute stop over on the Superlines terminal in Quezon).

May 17 - Day 1

We just slept through the night. by 6:30AM we finally arrived on the bus terminal in Daet.

This was our itinerary for the day c/o iAdventure Style Tours:

Meet Up at Jollibee, Daet

We rode a tricycle from the terminal to Jollibee. good thing one of our friends is a native from the nearby town of Mercedes, Camarines Norte so we were confident that we will not get lost. We had our breakfast there while waiting for the tour guide.

Head to the Paracle Camarines Norte Port

Our tour guide finally arrived and we were transferred to a nice air-conditioned bus together with other people that were also scheduled for a trip on that day . We were headed to the port to ride a boat that will take us to the island. the bus ride took less than 30 minutes.

Arrival in Paracle Port and Boat Ride

When we arrived, the boat that was supposed to pick us up is not yet there so we just waited for quite some time and bought some snacks in the nearby sari-sari store. We were among the first ones to be seated when the boat came. We chose to sit on the front as it is more convenient and comfortable. So far so good! Everything was going well. We were leaving at last :)


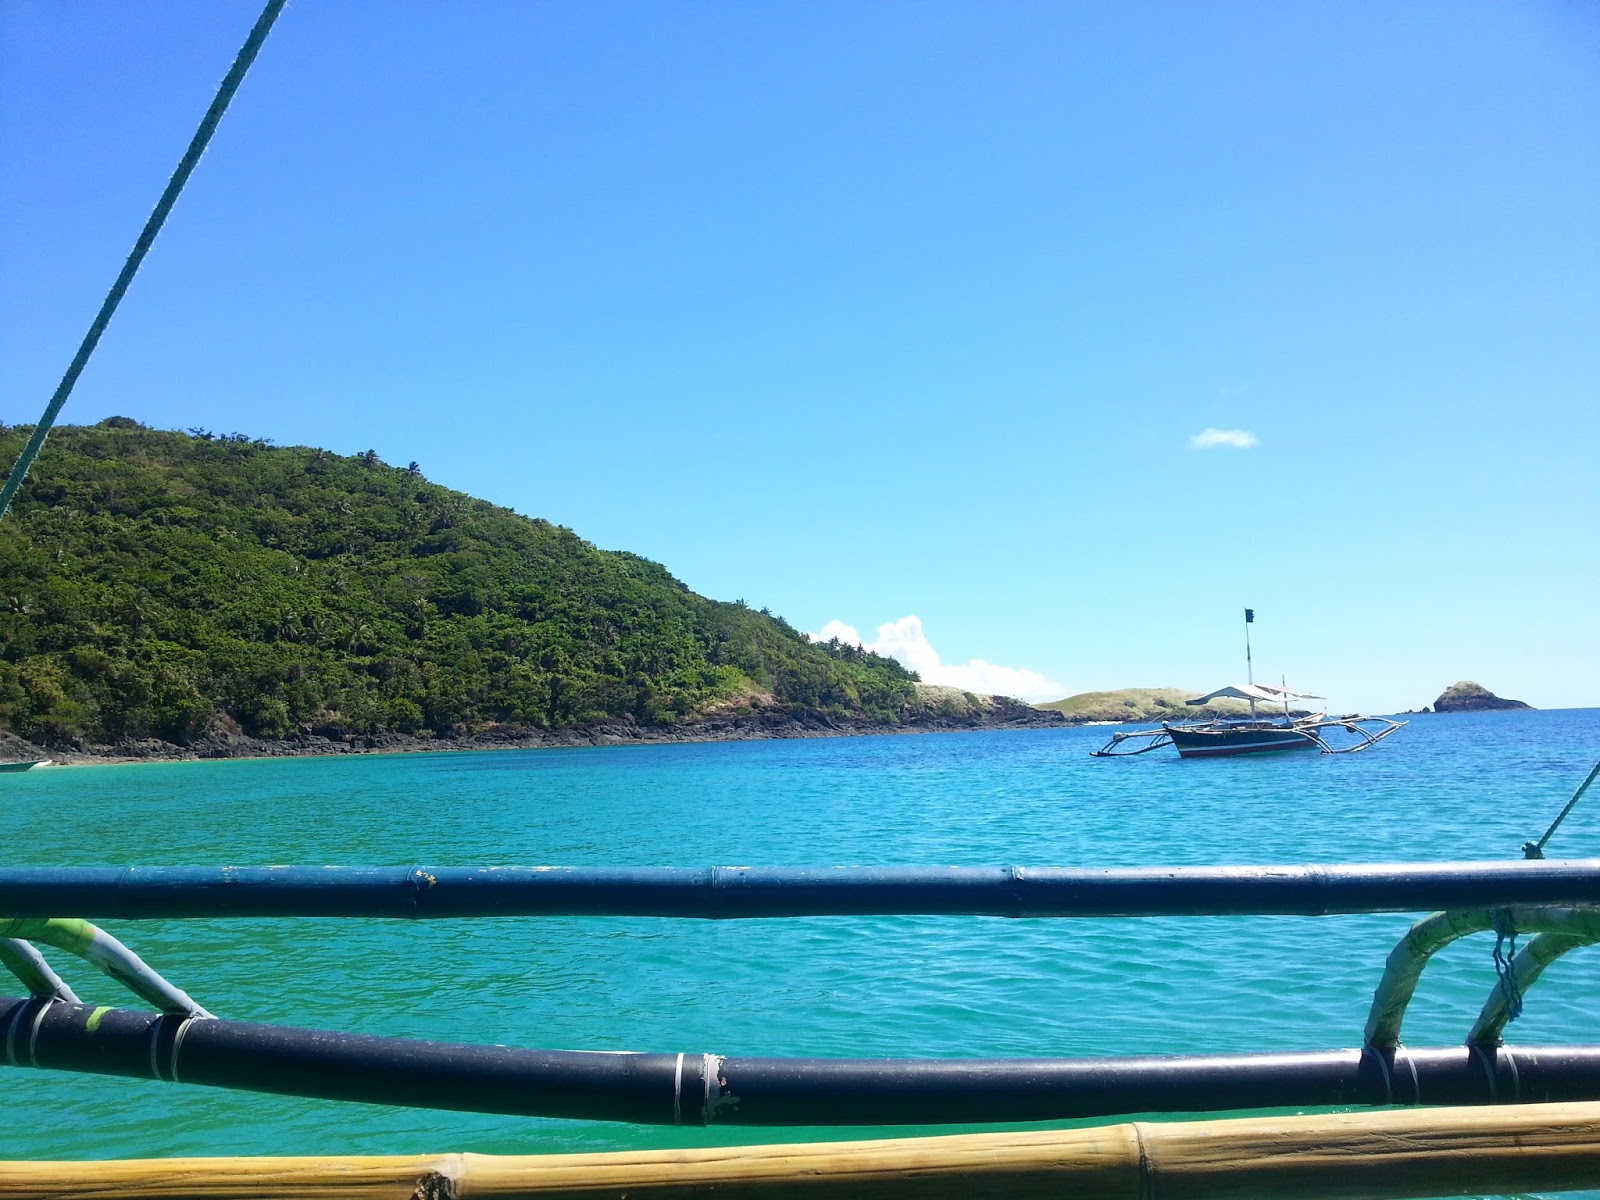
The view from the ocean is amazing! We saw lots of Islets with blue - green waters and white sands. The boat ride took more or less 2 hours. It was a long ride but the beautiful sceneries along the way made our trip worthwhile.

View from our boat


Mountains and white sands from afar


Arrival: Calaguas Island (Mahabang Buhangin)

We were all in awe upon setting foot on the island, it was one of the best places that I've ever seen in my life!

Touchdown

Blue waters = perfection

Upon arrival, we were brought to a small nipa hut to drop off our things while the staff prepared our tents and our lunch.

The simple life

After our delightful lunch, we relaxed for a while and decided to have henna tattoos since it was included on the package :)

Our basic henna tattoos


Free Time on the beach

We headed to the beach as soon as our tattoos were dry. The weather was perfect! We enjoyed the summer heat :) We swam our hearts out, took lots of photos and just waited for the sun to go down.

Sun - kissed 

Sunset in Calaguas

As night came, we just had our dinner, changed into our sleepwear and settled in on our tents as we were very tired and we had to prepare for the activities the next day.

Tired, sun burnt but happy :) 


Wednesday, July 15, 2015

How I got my BIR TIN ID card

As I am currently unemployed, I have all the time in the world to do the things that I failed to do when I was still working. I realized that after 7 years of working I only have 2 valid ID's so I decided to collect all the possible valid ID's that I can use.

One of the easiest ID to get is the TIN (Taxpayer Identification Number) ID card from BIR. Although it is not considered as a primary ID for some offices or establishments, this card does not expire; you do not need to have it renewed from time to time thus making it the most convenient ID to have.

My Free and Easy Experience

I went to RDO (Revenue District Office) No. 38 as my previous workplace is part of the North QC district. It is located in West Ave. Building, 112 West Avenue, Quezon City - in front of St. Vincent School. Before entering the premises, be sure to wear an appropriate attire as BIR implements a strict dress code for visitors. (shorts, flip flops, short skirts, spaghetti strap and sleeveless blouses are not allowed). I went there wearing slippers, thankfully the guard allowed me to enter as it was raining during that time. I told him that I am applying for my TIN card and he told me to go to the 3rd floor.

Upon reaching the 3rd floor, there is a small reception with one office staff. I told the person about my intention, he asked me if it was my 1st time to apply for the ID and I said yes. He then gave me the application form and another piece of paper with a number in it and told me to go to Counter 5. I then sat on the waiting area, filling out the necessary details such as my name, birth date and TIN number. Much to my surprise in less than 2 minutes the lady on the counter was already shouting my number.


The lady verified the details that I wrote, she also asked me to write my address. After that she gave me the claim slip and told me that I can get it the next day from 8AM to 4PM. It's strange because she didn't asked for any requirements but I still brought 1 valid ID and birth certificate just in case. All in all, the process took less than 15 minutes and it's free for 1st time applicants. I must say that I was satisfied with BIR's service.

I came back the next day with a friend. I just told the guard and the office staff that I will claim my ID and they easily allowed me to enter. same old step, I waited for the lady on Counter 5 to call my number. When it was already my turn, she verified my personal details again before giving the card. after that I signed a log sheet containing my record, it is their basis that the ID has been claimed. The process took less than 10 minutes. Kindly take note that they will only give you a paper card. You are going to be responsible for putting your 1x1 photo and of course for the lamination.

Actual TIN ID ( personal details removed for privacy)

My Observations

All in all, I can say that I had a pleasant 1st time experience in getting my TIN ID.

Just a few thoughts and observations based on my own encounter in RDO 38:

1. They did not ask me for any requirements. upon reading other blogs and articles, it is said that most offices require a valid ID and birth certificate. Be ready to bring them just in case.

2. They do not have a cut - off period. they entertain applicants from 8AM to 4PM. Whether you were there early or late, you will get your card the next day. I noticed that most counters only have 1 staff so they don't have time to encode, print and give the card to you on the same day.


Tuesday, June 30, 2015

First of summer in Burot Beach


Our busy schedule did not allow us to have an overnight summer vacation or longer so we decided to go on a day tour on one of the places near the Metro. Thanks to the very helpful post of blogger pinoyadventurista, me and my friends came up with the idea of spending our first summer getaway last year in Burot Beach.

On the day of the trip, we agreed to meet at MRT Taft station at 6AM. We then went to the Calatagan van terminal at the back of Kabayan Hotel. It was Labor Day during that time, many people were waiting in line and I guess almost all of us were headed on the same direction. We were seated after waiting for more than an hour. At long last, our adventure is about to begin!

10:30AM. after 3 hours of travel, we finally arrived at the Calatagan public market. The van/bus terminal is also situated there. A friendly tricycle driver approached us just as we arrived, he offered us a tricycle ride to Burot Beach. He seemed nice so we agreed. As we were only visiting for a day tour, we only bought light snacks, water and rice. we looked for a nearby carinderia and bought two variants of ulam.

The tricycle ride only took 5 to 10 minutes. the paths leading to the beach are bumpy and undeveloped as Burot is situated past a remote Barrio.

Upon entering, we were asked to pay for the day tour entrance fee. We then searched for a comfortable place to set up our tent. After eating our lunch, we first explored the place before swimming. The beach itself is small, it doesn't look like a beach after all - more like a cove. I did appreciate the off - white sand and blue green waters and we were lucky enough to spot some star fishes. they were awesome and beautiful!

Friendly reminders that you may want to take into account before planning your trip :)

1. Bring your own tent. while there are cottages, tables and tents for rent, it is best to bring your own. we went there during the peak season so tent rentals were out of sight. it was a good thing that our friend was prepared to bring his own.

2. Bring your own food. Because we were only there for half a day, I did not notice if there were food kiosks or mini restaurants available. There were people selling dirty ice cream, bottled water and snacks though. Also, please be mindful and responsible enough to clean after your trash. it will be very helpful if you bring your own trash bags.

 Burot Beach in Pictures :)

Upon entering Burot Beach
We managed to set up the tent in a shady area
My take on the beach front
Fine waters
The rocky part of the beach
Starfishes!

Itinerary and Expenses

**Day tour only for a group of 3 people**

PHP 180.00 - Van - Pasay to Calatagan terminal
        150.00 - tricycle going to Burot Beach - 50 each
        105.00 - lutong ulam bought at the nearby carinderia - 35 each
         65.00 - day tour entrance fee
        150.00 - tricycle to the terminal - 50 each
        180.00 - Bus - Calatagan terminal to Baclaran

Individual expenses - P560.00 each

Note: this trip was held last May 1, 2014. transportation and entrance fees may change